Block structure in JavaScript
In this document, we'll discuss how to use JavaScript to define the inputs and fields (including labels) in your block. If you're not familiar with these terms, see Anatomy of a block before proceeding.
You can also define your inputs, fields, and connections in JSON.
Append inputs
The JavaScript API includes an append method for each input
type:
- JavaScript
init: function() {
  // ...
  this.appendEndRowInput()
      .appendField('for each')
      .appendField('item')
      .appendField(new Blockly.FieldVariable(), 'VAR');
  this.appendValueInput('LIST')
      .setCheck('Array')
      .setAlign(Blockly.inputs.Align.RIGHT)
      .appendField('in list');
  this.appendStatementInput('DO')
      .appendField('do');
  this.appendDummyInput()
      .appendField('end');
}
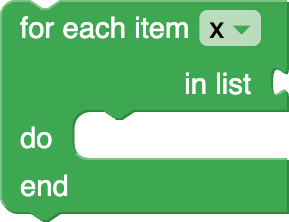
Each appendInput method can take an identifier string, which is used by code
generators to retrieve code for the block connected to the input. Code
generators rarely reference dummy and end-of-row inputs, so there is generally
no reason to assign them an identifier.
The JavaScript API also includes a generic appendInput method for appending
custom inputs. Note that in this case, the identifier should
be passed directly to your custom input's constructor.
- JavaScript
{
  // ...
  this.appendInput(new MyCustomInput('INPUT_NAME')).appendField(
    'an example label',
  )
}
All of the appendInput methods (both generic and non-generic) return the input
object so that they can be further configured using method chaining. There are
three built-in methods used for configuring inputs.
Input labels
Inputs on blocks have default accessibility labels that are derived from the
surrounding text on the block. For example, the "in list" value input on the
for each block above is labeled in list, which comes from the label field
that precedes it. A screen reader uses this label to describe the input's empty
connection and to give context to any block plugged into it.
For some custom blocks, this derived label does not provide enough information. Consider a block that builds a coordinate point:
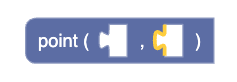
Both value inputs are preceded only by punctuation, so the highlighted input's
derived label would read ,, which tells assistive technology users nothing
about what belongs there. To provide more information, you can set custom labels.
In this case, "x coordinate" and "y coordinate" would be appropriate.
You can set the label for an input by calling setAriaLabelProvider on the
input in the block definition. The provider can be either a string or a function
that returns a string, to support dynamic labels.
- JavaScript
init: function() {
  // ...
  this.appendValueInput('X')
      .setAriaLabelProvider('x coordinate')
      .appendField('point (');
  this.appendValueInput('Y')
      .setAriaLabelProvider('y coordinate')
      .appendField(',');
  this.appendDummyInput()
      .appendField(')');
}
Passing a function instead of a string lets you build the label dynamically, for
example from the block's current field values. The function receives the
Input and returns a string (or null to fall back to the default label).
- JavaScript
init: function() {
  // ...
  this.appendValueInput('DURATION')
      .setAriaLabelProvider((input) => {
        const units = input.getSourceBlock().getFieldValue('UNITS');
        return `duration in ${units}`;
      })
      .appendField('wait');
}
To provide a localized label, pass a string containing a
Blockly.Msg reference of the form
%{BKY_...}. Blockly replaces the reference with the corresponding message at
render time.
- JavaScript
init: function() {
  // ...
  this.appendValueInput('X')
      .setAriaLabelProvider('%{BKY_POINT_X_ARIA_LABEL}')
      .appendField('point (');
}
You can set the same labels in JSON.
Append fields
Once an input has been created and appended to a block with appendInput, one
may optionally append any number of
fields to
the input. These fields
are often used as labels to describe what each input is for.
- JavaScript
init: function() {
  // ...
  this.appendDummyInput()
      .appendField('hello');
}

The simplest field is a label. Blockly's convention is to use all lowercase text, with the exception of proper names (e.g. Google, SQL).
An input row can contain any number of fields. Multiple appendField
calls may be chained together to efficiently add several fields to the same
input row.
- JavaScript
init: function() {
  // ...
  this.appendDummyInput()
      .appendField('hello')
      .appendField(new Blockly.FieldLabel('Neil', 'person'));
}

The appendField('hello') call is actually a shortcut for using an explicit
FieldLabel constructor: appendField(new Blockly.FieldLabel('hello')).
The only time one would wish to use the constructor is when specifying a
class name so that the label may be styled using a CSS rule.
Field labels
Similar to inputs, every field has an accessibility label. The default label is
determined by the type and value of the field, in the form
<type>: <value>. For example, a FieldNumber with the value 123 is labeled
number: 123.
For some blocks, you might want to use a more specific description for the type
of field than simply "number" or "dropdown". A block that sets the speed of a
motor might want to label its number field as "speed", for example, so that a
screen reader announces speed: 100 instead of number: 100.
There are two ways to set the type name for a particular field instance on a block.
The simplest is to pass an ariaTypeName in the field's constructor
configuration object. This object is the field's last constructor argument (its
position depends on the field type), and is where you configure other field
options too.
- JavaScript
init: function() {
  // ...
  this.appendDummyInput()
      .appendField('set motor speed to')
      .appendField(
          new Blockly.FieldNumber(
              100, // value
              0, // min
              255, // max
              undefined, // precision
              undefined, // validator
              {ariaTypeName: 'speed'}, // config
          ),
          'SPEED');
}
Alternatively, call setAriaTypeName on the field:
- JavaScript
init: function() {
  // ...
  const speed = new Blockly.FieldNumber(100, 0, 255);
  speed.setAriaTypeName('speed');
  this.appendDummyInput()
      .appendField('set motor speed to')
      .appendField(speed, 'SPEED');
}
Either way, the type name may contain a
Blockly.Msg reference of the form
%{BKY_...} for localization, the same as input labels and role descriptions.
To set the label for all instances of a particular type of field, override
getAriaTypeName in a custom
field
instead of setting it per instance.
You can set the type name in JSON as well.
Connection checks
- JavaScript
init: function() {
  // ...
  this.appendValueInput('NUM')
      .setCheck('Number');
}
The setCheck method is used for type-checking connections. If given
an argument of null, the default, then this input may be connected to any block.
See Connection
checks for
details.
Align fields
- JavaScript
init: function() {
  // ...
  this.appendValueInput('LIST')
      .appendField('in list')
      .setAlign(Blockly.inputs.Align.RIGHT);
}
The setAlign method is used to align fields within an input. There are three
self-descriptive values which may be passed as an argument to this function:
Blockly.inputs.Align.LEFT, Blockly.inputs.Align.RIGHT, and
Blockly.inputs.Align.CENTER.
When a block is rendered in right-to-left mode (e.g. Arabic and Hebrew), left
and right are reversed. Thus Blockly.inputs.Align.RIGHT would align fields to
the left.
Accessibility role descriptions
All blocks have an aria-roledescription
so that screen readers announce the block with a useful role rather than the
default "graphics element".
The default roles Blockly uses are based on the connections available on a block. They are:
container(has at least one statement input)value(has an output connection)statement(all other blocks)
These role descriptions are localized. Note that we do not include the word "block" in the role description, as feedback from users was that including the word "block" was too repetitive and noisy in the screen reader output.
Custom role descriptions
In some situations, you may want to set a custom role description on your custom blocks. We recommend that in most cases you use the default role descriptions rather than setting a custom role description for every block. Generally, the text on the block, forming the aria label for it, should tell users what the block does. The role description gives users a hint about the shape of the block and what kind of connections it can form.
If you have blocks that are a different shape from other blocks, that may be a
good use case for setting a custom role description. For example, boolean blocks
in the Zelos renderer have a hexagonal shape and can only be put into certain
input connections, so they are different from other "value" blocks. You can set
a custom role description by calling setAriaRoleDescriptionProvider in the
block definition. As with input labels, you can pass either a string or a
function that returns a string.
- JavaScript
init: function() {
  // ...
  this.setAriaRoleDescriptionProvider('boolean');
}
To localize the role description, pass a string containing a Blockly.Msg
reference of the form %{BKY_...}; Blockly replaces it at render time.
- JavaScript
init: function() {
  // ...
  this.setAriaRoleDescriptionProvider('%{BKY_BOOLEAN_ROLE_DESCRIPTION}');
}
You can set a custom role description in JSON as well.
By default, Blockly does not set boolean blocks in Zelos to a "boolean" role description, as not all users will be familiar with this term. However, you can do this in your own application if the term makes sense for your users.